Apply Zettelkasten to improve English with Trello

Recently, I was introduced to Zettelkasten from X-Team blog. It is a system, a method to capture and retain knowledge.

Zettelkasten suggests an approach to solve a common problem – Unless you have a super memory, you forget what you have learnt weeks ago, even days. "I remember I read it somewhere, that I know it" – I told myself many times when, for example, I saw old words. Words that I read the other days in articles, in conversions,…

Nowadays, knowledge is almost free. You can search for almost anything using a search engine such as Google, Bing, … We do not have to remember too much as far as we know what and where to find what we need.

That reasons well with some area, especially information that we do not need to access frequently. I want to turn information into my knowledge as much as possible. That is the only way for me to grow.

Being a software developer, I use English in my job, mostly in writing. I write code in English; I write/read documents in English; I communicate with my clients, coworkers in English. I am glad to have opportunities to learn new words, new expressions. Below is my flow when I meet a new word

  1. Lookup their meanings, usually via Collins Dictionary – I highly recommend it
  2. Read through the definition and guess the meanings. And to understand what the other person (or the document) was trying to say

The flow took around 1-3 minutes. And I was done. I declared the victory. I thought I got it. Until! A few days later, or weeks, I saw it again. I could not access its meaning from the memory. I knew it. I just could not access it. The knowledge about that word was not mine.

So the best thing I could do was to repeat the flow, again. It sucks! Really sucks!

When I read about Zettelkasten, an idea was flashing in my mind. Hey! I could utilize this system to capture and retain knowledge. I could improve my English situation. So I have started Zettekkasten.

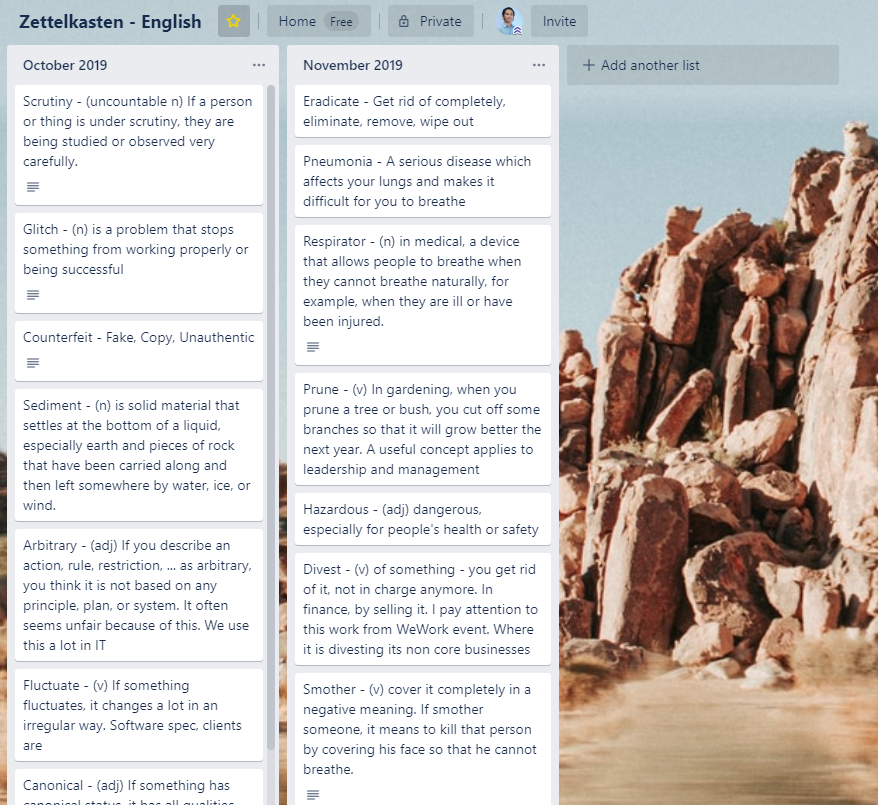
Zettelkasten-English-Board
Zettelkasten English Board

Tool – Trello

Next, I need a tool to capture knowledge. Trello came to my mind immediately. I have been using it for years. I knew it was a perfect tool for this purpose. I suggest you visit Trello for a complete list of features, of what It can support your creativity.

Why Trello? Because:

  1. Access everywhere as far as you have internet access. You can use the web version, the mobile apps version (Android and iOS)
  2. There is a free version which supports basic functionalities. That is all I need for knowledge capture
  3. Organize information in lists and cards. A card is like a sticky paper note, a perfect tool to brief information
  4. Easy to use
  5. Search fast
  6. It gives me the feeling that I am working with paper and sticky note, the paper sticky note. That feeling is important because it lowers the barrier. So simply it makes me feel good

Prepare the garden

Trello is a general purpose tool. You use it with your own creativity. To use it for Zettelkasten (yes I use that term more often to remind me of capturing and retaining knowledge), I have to prepare. Turn Trello’s list and card into Zettelkasten holder.

I decided to group words by months. I wanted to see what I have learned over the time; and at what moment (at what month is good enough) in time.

  1. A list is a month
  2. A card is a word. The card title has a short description of the word. This allows me to recite them faster by glancing at the board. All the detail, example, … is in the card’s description. And usually I put a link to the Collins Dictionary. I can read them in detail by following the link. Easy and fast

I name the board: Zettelkasten – English. This reminds me of the approach I am using and what the board is having. Next year, I might need a new board with the year. But now, I do not worry that much.

It is easy like that.

So my flow has changed

  1. Look up the meaning in the Collins Dictionary
  2. Create a card in the right list. If the list (the month) does not exist, create a new one. It is important to spend a little time to write your own understanding of the word

Note: Avoid copy and paste as much as possible. Writing will help remember better.

Eat the fruit

Setting up and leaving it there will not help. I need to tweak my routine, my habit to take advantages of the Zettelkasten.

At work, I often open that Trello board in a browser tab. It allows me to add new words faster. Some minutes of reviewing the board has a tremendous impact on my memory. It will enforce my long term memory.

I also install the Trello app on my phone. I have short idled periods while waiting for my kid, before taking them to school and pick up after classes. Instead of visiting facebook, twitter, news, … open the Trello first; glance at the board, and continue my normal routine if I wish to.

The app allows me to add new words anytime, anywhere. I simply capture them first, then work on the detail later.

I utilize my time better without impacting anything.

I have had the setup for over a month (there are 2 months on the board at the time of this writing). So far it works beautiful. I still need to practice and enforce my disciplines.

Why do I limit myself only to the English? So I have applied in other knowledge areas: technology, book. They require different setups but the principles remain.

Zettelkasten with Trello sound a good couple.
Teamwork by Giving Implementation Hints

Tom and Jerry work in an agile development team building a web application. The team has 4 developers. In the planning meeting, Tom is assigned to a product backlog item (PBI). The PBI is simple. Anyone in the team can implement it.

Tom implemented the PBI the day after. It worked. A pull request (PR) was created and asked Jerry to review it. It is a normal process of the team.

Jerry left a comment in the PR:

Hi Tom, we already implemented the same thing at X feature. There is a common method that you can reuse.

A very constructive, useful feedback. Except the consequences:

  1. Tom has to throw away his implementation and reuse the existing one
  2. Waste of time from both sides: implementer and reviewer

Does it sound similar to you? – A common problem: Developers re-invent the wheel.

Why

The fact is that it is hard for a developer to know everything in the system. For many, that is impossible. Developers take PBI from the sprint backlog and work on them. How could they know what are already implemented? What could they reuse?

Discussions can help if you know what to discuss. Asking questions on the team can help if you know what to ask.

Reflecting on your team, how many times do your developers ask questions regarding to the implementation, to what to reuse. It is easier said than done.

Developers tend to write their own implementation. Because they think it will be faster and safer for them. So they just write code. And one cannot ask that question for every single PBI.

What Could We Do to Improve?

I am not a big fan of theory saying that developers should be proactive, ask questions. Yes. They should and they might will if that is the business logic. Or that is something unclear in the specification. Implementation? Not really.

Well-planned in the planning meeting can help. However, people have not talked much about technical design (or implementation hints) in the planning meeting.

Asking questions in the daily stand-up? I have not seen many questions asked in that regard. Most of the messages in the daily stand-up are status report. Just they are expressed in a different way.

So what could we do?

Give implementation hints in comments of PBIs

Each developer has different knowledge about the system. When an PBI is reviewed, some might have an idea of:

  • What it is
  • How to implement
  • What could be reuse
  • Reference points such as old PBI, Pull Request, or a specific commit

So instead of keeping them in your head, write comments in the PBI. When a developer starts implementing the PBI, he/she has a good starting point. From there, he/she can start discussions, asking questions. Because they know what to ask and who to talk to.

In a team, the most skilled, familiar with the code should look around the team backlog. Try to give as many hints as possible. Anyone can do it as well.

The approach has a compound effect. The teamwork is at the next level. Developers care about other PBIs, about the team. It also encourages conversions, engagement. When a developer leaves a comment, the conversion has started.

Take Away

Give implementation hints, folks, give implementation hints. Your teammates do not know what you know. The developers working on those PBIs will thank you. And in turn, they will do you a favor. That is where the conversation, the engagement begin.

Build a Search Box in Web Application with Bootstrap

What could it take for a C# developer (backend developer) to implement a simple, typical search box in a web application?

This is what I wanted to build

Search Box

Let’s find out. So I created a web application with .NET Core 3.0 using the template provided by the .NET Core CLI.

dotnet new webapp

The command line creates a new Web Application (with Razor Pages, Not MVC template).
And I want to have a typical search box with an input field and a search icon. For many web developers, It is a trivial task. I thought so as well. So I had this code in the Index.cshtml

@page
@model IndexModel
@{
    ViewData["Title"] = "Home page";
}

<div class="text-center">
    <h1 class="display-4">Welcome</h1>
    <p>Learn about <a href="https://docs.microsoft.com/aspnet/core">building Web apps with ASP.NET Core</a>.</p>
</div>
<form method="Get">

<p>I want to have a search box</p>
<br />
<div class="form-group">
    <div class="input-group">
        <input type="search" class="form-control" value="" width="200" />
        <span class="input-group-btn">
            <button class="btn btn-default">
                <i class="glyphicon glyphicon-search"></i>
            </button>
        </span>
    </div>
</div>

</form>

Bootstrap 4 – Remove Glyphicons

For those who are new to CSS/HTML, it is a typical form using Bootstrap. All classes are from Bootstrap.

Press F5 and wait for the nice result. The result? A search box without the search icon. Oh man! what have I done wrong? When things go wrong, ask your friend Google. Looking for Glyphicons on Bootstrap brings me to this removed components in Bootstrap 4. The Glyphicons is on the removed list.

It turns out that the project created in .NET 3.0 comes with the latest Bootstrap version

/*!
 * Bootstrap v4.3.1 (https://getbootstrap.com/)
 * Copyright 2011-2019 The Bootstrap Authors
 * Copyright 2011-2019 Twitter, Inc.
 * Licensed under MIT (https://github.com/twbs/bootstrap/blob/master/LICENSE)
 */

Welcome to Font Awesome

So the suggested alternative is Font Awesome. I was totally new to these stuff. So I went to the Font Awesome Site and followed along.

Font Awesome comes with free and paid collections. I made sure to go with the free one, download them from the download page. I just wanted to play around with CSS, so I chose the Solid style.

To know which icons are available for free, visit solid style explorer

I put them all in wwwroot\lib\font-awesome (same level with bootstrap folder). Let’s use font awesome instead of glyphicon

<div class="form-group">
    <div class="input-group">
        <input type="search" class="form-control" value="" width="200" />
        <span class="input-group-btn">
            <button class="btn btn-default">
                <i class="fas fa-search"></i>
            </button>
        </span>
    </div>
</div>

The difference is at the i tag

<i class="fas fa-search"></i>

Visit font awesome basic use to know about style prefix for different licenses and styles.

And the last pieces, include font awesome css files. In my case, it is in _Layout.cshtml

<!DOCTYPE html>
<html lang="en">
<head>
    <meta charset="utf-8" />
    <meta name="viewport" content="width=device-width, initial-scale=1.0" />
    <title>@ViewData["Title"] - WebApp</title>
    <link rel="stylesheet" href="~/lib/bootstrap/dist/css/bootstrap.css" />
    <link rel="stylesheet" href="~/css/site.css" />
    <link rel="stylesheet" href="~/lib/font-awesome/css/fontawesome.css" />
    <link rel="stylesheet" href="~/lib/font-awesome/css/solid.css" />
</head>

Require 2 files: fontawesome.css and solid.css

And that how I have my search box with additional learning along the way. I now know a bit or two about CSS and Font Awesome. Definitely I will read more about them and create some simple forms. This kind of learning fits well with the 1-hour time-boxed.

Python – Ways of Handling Exceptions

Another step in my Python journey, this time I learn about exceptions – raising and handling exceptions. The syntax is simple. I can reason about them because they look familiar with C#.

try:
    // Do something
except ValueError as e:
    // Do something
except KeyError:
    // rethrow the original exception
    raise
finally:
    // Clean up. Code that will run regardless of

What interesting is the Python philosophies about exceptions:

  1. Avoid creating your own custom exceptions if possible. Encourage to use the built in ones.
  2. Error codes are silence, exceptions are not. It is more about design/code principle. Instead of returning an error code, let the application throw exceptions or fail.
  3. Handle exceptions that your function are expecting or capable of.

I have seen applications where custom exceptions are defined. If well-designed, they serve good purpose. Otherwise, they cause some trouble – lost in translation

  1. Stack trace not preserved
  2. Consumers catch custom exceptions and it is hard to handle it correctly. Why? How could it know what the actually root cause? – the inner exception part.

While writing this, a retrospective moment came up in my head. I have not seen, I have not documented much, the exceptions in code. Except framework code, where they always document what exceptions might be raised. In business applications, for applications I have seen/written so far of course, we do not have a habit of documenting possible exceptions.

Let weight it as essential habit and practice.

So what have I learn to help me becoming a better developer?

  1. Before writing your own exceptions, search and use the common, well-designed, existing ones.
  2. Document your API with possible exceptions. Eventually, exceptions are also output from your API. Consumers need to be aware and have a plan to handle them properly.
  3. Custom exceptions must be designed with care.

Python to Cosmos

Another step in my Python journey. This time I want to explore what it takes to work with CosmosDB in Python. I document the progress as I go and then update the overview.

In the end I have learned these:

  1. Python Package Management (PIP) – to consume packages from the community
  2. Install Python 3 and get it worked on Mac alongside with preinstalled Python 2.7
  3. Azure Cosmos Python SDK
  4. More confident in writing Python code

Things look simple and easy in abstract, in thinking. But the devil is in the detail, in the implementation level.

Python Package Management – PIP

Just like NuGet in .NET ecosystem, PIP allows developers to consume packages created by the community. According to the documentation, when Python 2.7 or 3.x is installed, PIP is installed as well.

However, when I run on Mac, it said the PIP is not a valid command. The solution is described in SO. In short, run this command

sudo -H python -m ensurepip

After that, run this command to see what you can do with PIP

pip

Most of the time, the install command is used.

pip install {package_name}

Cosmos

Cosmos has a Python SDK which is available via azure_cosmos package. There is also a step by step instruction. If one wishes to see the sample code, MS provides a sample code here

Installing the package is not going well. If this command does not work

sudo -H pip azure-cosmos

Then try this one. It works well for me

sudo -H pip azure-cosmos --upgrade --ignore-installed six

Python Versions

Mac OS has preinstalled Python version 2.7.10, so the pip is attached to the version. I want to have the latest version which is 3.7.4 at the moment. I definitely do not want to mess up the current version. Mac OS has many built in functions with Python, well at least as my guess.

brew install python

Will install the latest Python version available with the new command python3 So does the pip3. Let install azure-cosmos again for Python 3

sudo -H pip3 azure-cosmos --upgrade --ignore-installed six

Get Hands Dirty

Most of the code is out there with a few search. My objective is just to get the flow and how code is organized in Python.
The first step is to create Azure CosmosDB account first. By creating a new resource group, I can clean it everything when not in used.

Import Cosmos Package

To consume a library, it needs to be imported into the file, the same as using in C#

# Import cosmos client and alias
import azure.cosmos.cosmos_client as cosmos_client

# To ensure it is valid
print(cosmos_client)

Using alias allows us to write readable code. Instead of writing the full path azure.cosmos.cosmos_client, just write cosmos_client or whatever alias we please. Executing the above code will display the cosmos_client module

<module 'azure.cosmos.cosmos_client' from '/Library/Frameworks/Python.framework/Versions/3.7/lib/python3.7/site-packages/azure/cosmos/cosmos_client.py'>

So far so good!

Config to Cosmos

To connect and work with Cosmos, we need a couple of information. I usually prefer to wrap them in a single config object. In Python, a dictionary is perfect for this.

# Config for cosmos database. This is a dictionary in python
'''
Working with CosmosDB requires
    ENDPOINT: The URI identified the cosmos server.
    MASTER_KEY: Authorization key, just like username/password in SQL.
    DATABASE: The name of the database.
    COLLECTION: Or CONTAINER name.
Operations are per collection in Cosmos.
'''
config = {
    'ENDPOINT':'',
    'MASTER_KEY':'',
    'DATABASE':'',
    'COLLECTION':''
}

ENDPOINT and MASTER_KEY are from Azure CosmosDB account, you should be able to find them under the Keys section.
DATABASE and COLLECTION are from users, well from me actually. I am playing around with Cosmos using Python so I want to create them dynamically. So let write some lines to ask for that

# Prompt users for database name and collection
config['DATABASE'] = input("Database: ")
config['COLLECTION'] = input("Collection: ")

Very straightforward! Ask users for input with a prompt. OK! Ready to create my very first database

# Import the library and create an alias. Look the same as namespace in C#
import azure.cosmos.cosmos_client as cosmos_client

print(cosmos_client)
# Config for cosmos database. This is a dictionary in python
'''
Working with CosmosDB requires
    ENDPOINT: The URI identified the cosmos server.
    MASTER_KEY: Authorization key, just like username/password in SQL.
    DATABASE: The name of the database.
    COLLECTION: Or CONTAINER name.
Operations are per collection in Cosmos.
'''
config = {
    'ENDPOINT':'Fill in Azure CosmosDB account endpoint',
    'MASTER_KEY':'Fill in the primary key',
    'DATABASE':'',
    'COLLECTION':''
}
# Prompt users for database name and collection
config['DATABASE'] = input("Database: ")
config['COLLECTION'] = input("Collection: ")

print(config)

# 1. Initialize the client that can talk to the server
client = cosmos_client.CosmosClient(
    url_connection=config['ENDPOINT'], 
    auth={
        'masterKey':config['MASTER_KEY']
        })

# 2. Create a database
db = client.CreateDatabase({'id':config['DATABASE']})

print(db)
  1. Initialize a client instance
  2. Ask it to create a database

So how does it look?

<module 'azure.cosmos.cosmos_client' from '/Library/Frameworks/Python.framework/Versions/3.7/lib/python3.7/site-packages/azure/cosmos/cosmos_client.py'>
Database: Python-102
Collection: C102
{
    'ENDPOINT': 'Secret value', 
    'MASTER_KEY': 'Secret value', 
    'DATABASE': 'Python-102', 
    'COLLECTION': 'C102'
}
{
    'id': 'Python-102', 
    '_rid': 'CzhnAA==', 
    '_self': 'dbs/CzhnAA==/', 
    '_etag': '"00000900-0000-1800-0000-5d3be5650000"', 
    '_colls': 'colls/', 
    '_users': 'users/', 
    '_ts': 1564206437
}

The database Python-102 is created. The returned value is a dictionary containing essential information of the database. One important piece is the _self key, which is used to identify the database when creating a collection. Here it is, create a collection

# 3. Create a collection/container
collection = client.CreateContainer(
        db['_self'],
        {'id':config['COLLECTION']})

print(collection)

The cosmos_client exposes many APIs to work with CosmosDB. It is easy to create a document, query documents, and other advanced stuff if I wish to.

Say Something

The task sounds easy in your my head. The devil appears when I get my hands dirty in code. Thought, it is not a tough challenge. When I started to write both code and blog post at the same time, I gain triple outcome.

I started to love Python. It is a pleasure to write code in Python. I have been using Visual Studio and Windows for my career. I started to play around with Mac recently. Python helps me comfortable with Mac. This post is about Python and Cosmos. But I have to write my feeling after all.

What’s next? Write some utilities for myself. The goal is still to explore more about Python.